Using the Preview Panel in Windows 7 Folders
Browsing through a folder of images in Windows 7 can be a tedious activity, especially if the files are not labeled well. If you are looking for a particular file but do not know what it is called, you could spend more time than you need to by trying to locate that file. You can improve this process by using the Preview panel, which will show a quick preview at the right side of the window for the currently selected file. Step 1: Click the Windows Explorer icon in the task bar at the bottom of your screen. If this icon is not in your task bar, you can click the Start button, then click Computer in the column at the right side of the menu.
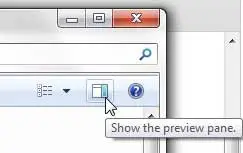
Step 2: Click the Show the preview pane button at the top-right corner of the window.
You should now see an extra column at the right side of the folder. Click a file in your folder to see a preview in this new column. You can see previews of images, documents, Powerpoint files, Excel files, and several others. Experiment with the different types of files on your computer to see the benefit that this setting can provide to you. Once you have enabled the Preview panel for one of your folders, it will be enabled for all of them. You can disable the Preview panel by clicking the same button that you used to turn it on. After receiving his Bachelor’s and Master’s degrees in Computer Science he spent several years working in IT management for small businesses. However, he now works full time writing content online and creating websites. His main writing topics include iPhones, Microsoft Office, Google Apps, Android, and Photoshop, but he has also written about many other tech topics as well. Read his full bio here.
You may opt out at any time. Read our Privacy Policy